Sunday, April 17, 2016

landscape wide angle lense photography


What is a wide-angle lens

In photography and cinematography, a wide-angle lens refers to a lens whose focal length is substantially smaller than the focal length of a normal lens for a given film plane. This type of lens allows more of the scene to be included in the photograph, which is useful in architectural, interior and landscape photography where the photographer may not be able to move farther from the scene to photograph it.
Another use is where the photographer wishes to emphasise the difference in size or distance between objects in the foreground and the background; nearby objects appear very large and objects at a moderate distance appear small and far away.
This exaggeration of relative size can be used to make foreground objects more prominent and striking, while capturing expansive backgrounds.
A wide angle lens is also one that projects a substantially larger image circle than would be typical for a standard design lens of the same focal length. This large image circle enables either large tilt & shift movements with a view camera, or a wide field of view.
                                                                                       collected from wikipedia.org

When to use a wide-angle lens

Many people think the purpose of a wide-angle lens is to photograph grand vistas and get a lot in the frame. While that is one purpose for a wide-angle lens, its real power is in using its perspective to emphasize objects that are very close to you and de-emphasizing objects that are farther away.

1. Emphasize a foreground element
landscape wide angle lense photography

Wide-angle lenses allow you to get really close to something in the foreground, which will emphasize it and make it look larger and more important than the background elements. A wide lens has a way of changing the relative size of the objects in the frame, so that things that are closer to the lens appear larger, and things in the background appear smaller proportionally.
20mm, ISO 200. f/5.6, 1/160 second
Try using a low angle and getting very close to your main subject. By close, I mean inches away. You’ll be surprised when you look through the viewfinder and discover that objects don’t appear quite so close through the lens.

2. Photograph your subject and its environment

My favourite way to use the lens is to get very close to my main subject so it is large in the frame, as mentioned above, but also include other elements in its environment in the frame. This is a great way to create a story-telling image that provides context for the main subject.
16mm, ISO 200, f/8, 1.3 seconds

3. Get everything in focus
landscape wide angle lense photography

Another great power of a wide-angle lens is its ability to have incredible depth of field. You can get everything from two feet away to infinity in focus. Of course, this depends on the exact lens and the aperture you choose, but all wide-angle lenses have a greater ability to get more in focus than a telephoto lens (which is excellent at shallow depth of field by blurring the background). You’d be hard pressed to blur the background with a wide-angle lens.
19mm, ISO 100, f/20, 1/20 second
You can use a hyperfocal distance calculator to figure out exactly what will be in focus for your lens at the aperture you choose. But generally speaking, if you focus on something close to you and use a small aperture like f/18, everything from front to back will be in focus.

4. Watch out for distractions

Since wide-angle lenses include a lot in the frame, you’ll need to be extra vigilant to make sure there are no distractions. Everything that is in the frame should have a purpose.
Check your composition to make sure there is nothing in the foreground that you didn’t notice, since objects just inches away from you will be in the frame. As well, check the background to make sure there you haven’t included something unintentional.
Ideally, your composition should clearly show what the main subject is, what the supporting elements are using an interesting graphic design, and not include anything else. Simplify the composition as much as possible.
11mm, ISO 100, f/20, 1/6 second
Because the frame contains such a wide field of view, it will have a lot in it, so it is especially important that the main subject is obvious.

5. Keep the camera level
landscape wide angle lense photography

Wide-angle lenses are notorious for displaying distortion around the edges. Anything with straight lines at the edges of the frame will appear to lean inwards. To avoid or minimize distortion, keep the camera level with the ground and don’t angle it up or down.

6. Angle your camera upwards

On the other hand, you can use this distortion to your advantage! Just make sure it is intentional and you are using it to emphasize something. For example, by angling the camera upwards you can emphasize the sky, and any clouds in it will appear to point towards the center of the frame.
15mm, ISO 100, f/11, 1/60 second

7. Angle your camera downwards
landscape wide angle lense photography

Similarly, if you angle your camera downwards you can emphasize leading lines on the ground and create a perspective that really draws the viewer in.

Saturday, April 16, 2016

street photography

Choosing the best lens

Deciding which lens to use is one of the most important factors for street photography. You may be tempted to use a telephoto lens, but that’s more than likely to result in more harm than good. You don’t want to be that creepy person standing across the road aiming a giant lens at strangers. If you want to look inconspicuous you’re going to need to get up close and among the action. Use a wide-angle lens and get lost in a busy crowd. Many street photographers choose a compact camera that’s less confronting than a large DSLR, the advantages being smaller, lightweight, and discreet.
street photography

Camera settings

The quickest and easiest way to set up your camera for street photography is by switching the camera to AV (aperture-priority mode) and selecting your f-stop (aperture) and ISO manually. The camera will then decide the shutter speed (exposure). On a bright sunny day a good place to start is around f/16 with an ISO between 200-400. If your camera displays a shutter speed higher than 1/200th a second you are ready to roll.
Take note of the shutter speed your camera is reading and make adjustments to aperture and ISO accordingly. If your camera is giving you a shutter speed that is below 1/80th you run the risk of a blurred shot, but that could be used for good effect too. To overcome blur simply increase your ISO and/or choose a wider aperture. If you’re new to photography you can always set camera to P mode (program or auto) and let the camera select the correct settings. You can still adjust the EV if you want to over or under expose the shot to your liking.
This is useful if you are shooting run and gun (in a hurry with no time to think), but you have little control over what the camera is doing, so this isn’t always the best option. Program mode does a pretty decent job, but I wouldn’t rely on it in low light where there’s a high possibility your shutter speed will be too slow to freeze the action.
street photography

Get close to your subjects

Using a wide-angle lens enables you to get nice and close to your subjects. The advantage of the wide angle gives the viewer a sense of being there in the moment. You’ll also blend in with the crowd as part of the environment, rather than standing out across the street with a long lens.
Many successful street photos were taken only few meters from the action and sometimes only centimeters away. Walking through a busy street, market or park can result in some rewarding pictures if you are observant and keep your eyes open for interesting subjects. If your images aren’t how you visualized them, then you may need to get closer, so use your feet as your zoom to be sure you’re in the right place at the right time.
street photography

Take your camera everywhere

Street photography is spontaneous and waits for no one. It’s a discipline you must practice to make perfect. Your camera is an extension of yourself — it’s your gateway to sharing your vision with the world and you don’t want to miss an amazing photo opportunity by not having your camera on you. If you’re serious about street photography, you will have your camera within reach at all times.
This is known as the ‘decisive moment,’ where you have only a split second to capture your subject before it’s gone forever. You rarely get a second chance, so be prepared.
street photography

Ignore the voice in your mind

Some people struggle with the idea of street photography. Some concerns may be the fear about your subjects getting angry because you took their picture, threaten you with physical violence, or even worse, call the police. Fear is simply false evidence appearing real. These are all common fears, but it’s possible to overcome by practicing and getting out more with your camera. Here are some suggestions to overcome your concerns.
Find an interesting spot to sit with your camera. I spend a lot of time at cafes and restaurants when I travel, my camera ready for any opportunities. Observing from a comfortable setting you’ll feel at ease and can wait for pictures to come to you. You are less likely to be noticed sitting outside a cafĂ© with your camera than standing in the middle of the street.
Tune out and listen to your iPod while you are out walking with your camera. Music is somewhat of a distraction that can help relax and inspire creativity. It may not sound logical, but it works wonders, and if it means you’re comfortable in your surrounds then it’s worth a shot.
street photography

Shoot from the hip

As a general rule of street photography, if you can get the shot with the camera to your eye, you will get a better shot. However, there are times when it’s not possible to raise the camera to your eye, and so shooting from the hip is a useful method of capturing a decisive moment.
street photography

Shoot at night

Night photography in the city is a great opportunity for unique images. It’s not as easy as shooting during the day; you will need to be mindful of low shutters speeds to avoid blur and use your ISO and aperture to compensate for low light.
Take a tripod with you if you plan on doing long exposures. Alternatively, using a fast aperture lens will enable you to shoot low-light scenes and still freeze the action. When shooting at night try finding interesting lines, shadows and compositions to give the image a bold visual statement. Silhouetted subjects are interesting and can create nice compositions with the shadow filling the foreground.
street photography

child photography


Photographing children is something that many photographers say should be avoided at all costs! While it’s fair to say that child photography can be challenging, it really doesn’t need to be a painful experience. If you’ve got children of your own or friends with kids, grandchildren, nieces or nephews, taking family portrait photography to capture the magic of an exploding smile, the emotion of a child in thought or the expressiveness of a mischievous grin far outweighs the risks of tears and tantrums.
child photography

If you’ve ever struggled with photographing children, we’ve got the solution to your problem. We’re going to show you how to take the stress out of child photography and create a natural environment that’ll reward you with winning shots.
Forget about formal settings and posed shots. Those aren’t the ideal situations for taking portraits of children that also express their personalities. For natural-looking child photography we’re going to create a relaxed and casual environment in which children can simply play and be themselves, and while they’re playing we’re going to capture candid images.
This is a great way to capture natural expressions and the children won’t get so frustrated with adults pointing cameras in their faces or shouting at them to ‘say cheese’.
Despite the natural approach we’re taking, and the informal look of the resulting photographs, there’s an art to successfully capturing a real winner.
You need to make sure you’ve got the right location for child photography as well as for play, and that your camera and equipment is ready to go, as the children won’t wait for you to tweak your settings and setup. Let’s see how it’s done…

Step-by-step how to shoot natural-looking child photography


child photography

01 Go natural
Natural light is the best, so try to create a shooting environment outside using available light. We’re using a tree house, which works a treat as there’s some nice open shade and the background is good and natural. Otherwise most parks have great play areas that can work just as well, although make sure other people’s kids aren’t in shot.

child photography

02 Be prepared
Before you do anything you need to make sure your camera’s exposure settings are all sorted out. If you’re fiddling with dials or scrolling through menus in the middle of the shoot, not only will you run the risk of missing the shot, but the children will quickly start to lose interest in the whole event. Time is of the essence; use it wisely!

child photography

child photography

03 Action shooting
The settings you’ll need are similar to those you’d use for shooting sports or action photography. Use a fast shutter speed (such as 1/125 sec or faster) to avoid any subject movement. Don’t compromise on this – if you have to increase your ISO to 400 or 800, do so: your DSLR can handle it.

child photography

04 Beautiful bokeh
A wide aperture such as f/2.8 helps you achieve a fast shutter speed and creates a shallow depth of field, which will throw the background out of focus. This can be a useful way to de-clutter a distracting background. Depending on your lens, it can also introduce some striking bokeh effects.

child photography

05 Exposure Compensation
It’s usually a good idea to use exposure compensation. About half a stop overexposed works well. Your subject’s face can often fall into shadow, and this ensures there’s enough detail. The amount needed will vary depending on the location and light, so try a test shot if you’re uncertain.

child photography

06 Continuous mode
Switch your camera’s shooting mode to Continuous. When you’re getting some good shots, keep the button pressed to fire several shots in succession and you’ll be more likely to capture a winner. You’ll need lots of memory on your card, especially if you’re shooting raw format files (which you should be).

child photography

07 Fun time
Once you’ve got your camera set up you should be ready to start. It’s a good idea to start playing a game or engage with some sort of activity with the kids to get started. Don’t bring out your camera until everyone’s spirits are high. However, keep it near by so you can grab it when you need to.

child photography

08 Start shooting
Once everyone’s having fun, get your camera and fire off a couple of shots. A winning shot isn’t all about big smiles with the subject looking the camera – sometimes a more contemplative shot of a child concentrating on a game or puzzle or eating can be just as engaging.

for more

Friday, April 15, 2016

SELFE

what is selfi?
A selfie is a self-portrait photograph, typically taken with a digital camera or camera phone held in the hand or supported by a selfie stick. Selfies are often shared on social networking services such as Facebook, Instagram and Twitter. Wikipedia
Take Your Best Professional Selfie

Job search tips invariably emphasize how important presentation is. Treat your selfie with the same respect as you do your résumé and business card. Every aspect of the photograph should correspond with the image you want to project in your work. To ensure this, consider the following six points.
1. Examples. Review some headshots of professionals you admire and look for elements you’d like to use in your selfie. For example, if you like action shots that show professionals at work, then use that theme. Or if you prefer pictures of people sitting at their desks, use a similar style.

2. Setting/background. Brainstorm settings that support your polished and professional profile. For example, if you work in government, use a government building as a backdrop. If you’re a PR specialist, take a photo of yourself at a conference. If you’re a techie, make sure your computer’s in the shot. It’s also advisable to make sure nobody else is in the photo, especially if you intend to use the selfie on your social media accounts. If the image does include others, don’t simply crop them out, since the results could look messy and unprofessional. Instead, invest some more time and re-do your photo shoot in a place where you won’t be disturbed.
3. Color palette. Colors play an important role in the balance of an image. Lots of bright colors can be overwhelming, while predominantly subdued tones can be boring. Make sure to stand out in a good way by choosing contrasting colors. For example, in an urban setting with predominantly gray tints, select bright tones of blue, red or green. In an outdoor setting like a park, avoid greens, browns and blues and instead, choose reds, pinks or yellows.
Tip: Think twice before you wear something with a pattern. Dots, stripes and prints can distract the eye away from the focal point of the image: your face.

4. Attire. With the above tips on colors in mind, select clothes that are appropriate for your professional setting.
5. Lighting. Professional photographer Rodnesha Green advises using natural light, preferably in the morning or evening. You want to avoid hard illumination such as bright sunlight, indoor lighting or built-in flashes. The softer the light, the more flattering it is for your features.

6. Angles. The angle of your head relative to the lens can make or break a selfie. Taking a picture straight on will result in unflattering distortion, while looking down into the lens can give you the appearance of having a double chin. For the best angle, hold your device at arm’s length, then move it up approximately 45 degrees. This aligns your body and reduces distortion.
Unless you’re a seasoned model and photographer, don’t expect to get it right the first time round. But keep practicing and before you know it, you too can rock your selfie and land the job of your dreams!

Thursday, April 14, 2016

portrait photography


portrait photography

Many people will avoid picking up a camera because they think they don’t have an eye for photography. Contrary to popular belief, it doesn’t take talent to capture a solid portrait. It takes skill and the motivation necessary to master those skills. Portrait photography can be dealt with as an equation; with just a set of rules and guidelines, it’s possible to take jaw dropping, natural light portraits tomorrow. Here are seven steps to master portraits using natural light only.

Picking up a camera for the first time and pointing it at a subject can be quite overwhelming. Further, shooting for years and never finding satisfaction with the portraits captured can be frustrating. If the majority of the following steps are mastered, the results are guaranteed to turn people’s heads. The ambition necessary to master these rules will allow for a photographer to go above and beyond the person who is “born with the eye.”


1. EXPRESSION

portrait photography

People tend to forget that a portrait without a REAL expression does not connect to the viewer. Humankind wants to see genuine emotion and not a posed, cheesy smile. This is more important than location, light and expensive gear. Clients will more often than not choose the blurry images with bad compositions if it means those images are honest portrayals of themselves. The first thing people look at is the connection the subject has with the camera. The only way to achieve that is to make the subject comfortable. A Vital Detail Often Ignored is an in depth guide on how to make a subject feel natural in front of the camera.


2. COMPOSITION
portrait photography

The purpose of properly composing images is to attract the viewer’s eye straight to the most important detail of the portrait—the subject’s face and more specifically, the eyes. This is where two important rules kick in: rule of thirds and depth.

It is scientifically proven that the eye is most attracted to four different points of an image. Sticking with these four points will help frame the subject in the most pleasing manner. Further, when taking photographs, it goes without say that the images produced will be 2-dimensional. To make it look 3-dimensional and to make the subject pop out of the frame, there must be depth in the composition.  An image’s foreground, middle ground and background are essential in achieving the necessary depth. This article on bokeh discusses this concept in depth.


3. LIGHT
portrait photography

The topic of light deserves it’s own article but to be concise, there are two important things to keep in mind. Just like artificial light is very directional, natural light needs to be this way too. It is for this reason that using window light is so popular.

Further, when shooting outdoors, consciousness of the direction of light is intrinsic. To achieve the best lighting, have the subject face the light source. For example, using the beam of light coming from the ends of the street in narrow alleys or the light coming from the large opening in storefronts or garages. The above image was taken miday in the door way of a bar. In the case of open fields, the light oftentimes comes from above head. In instances like that, tilting the subjects face slightly upward towards the light has proven to be affective.

The second rule is time of day. Although clichĂ© and contrite, the golden hour is a real thing. Most importantly, it’s free and possibly the best quality light any photographer will ever use if used appropriately. An hour before sunset, the entire sky is one huge soft box. Harsh light that results from direct sunlight is very difficult to work with.


4. SETTINGS
portrait photography


It is very easy to get carried away with settings and gear. Oftentimes, the best advice is to take one lens and on camera body on a shoot. The less gear, the easier it is to concentrate on every other aspect. People are not interested in seeing a technically perfect portrait. They want to see a creative portrait.
Moreover, every DSLR has an aperture priority mode. This setting allows the photographer to choose the f-stop and iso, while the camera chooses the right shutter speed to expose the image properly. Why not let the camera do the extra homework, while the photographer focuses on more important details? Sometimes the camera will not do a good job in choosing the shutter speed, which can be easily overrided with the exposure compensation setting. This is easier and less time consuming than re-adjusting all the manual settings every time the location is switched.


5. LENS

portrait photography


Choosing the proper focal length is very important. The focal length has the potential to distort the subject’s head in one way or another. The longer the focal lengths, the more flattering it is for the subject and the shallower the DOF will be. Personally, I find that the 85mm on a full frame camera and the 50mm on a cropped sensor to be the optimal portrait lengths. Both are wide enough to capture the surrounding scenery with the appropriate distance and also with a few steps forward, they can achieve tighter portraits. Fixed prime lenses such as the 50mm or 85mm are fast lenses with wide apertures that will help shoot at wide settings. This is important when you want to melt away distracting backgrounds.learn more


6. Complimenting Colors


When it comes to choosing clothing, backgrounds and even toning in Photoshop following the complimenting colors makes a huge difference.

Notice the complementing colors in the color wheel. Chose clothing that compliments the skin or the background colors of the location. This is make the subjects stand out.


7. POSES

I’m not going to lie. Personally, when it comes to posing I have a very difficult time. Hand placement can make or break a photo. If it doesn’t look natural it stands out like a sore thumb. What I’ve found helpful is scrolling through images on 500px on my phone every night and taking screen shots of inspiring poses. On my shoots I whip out my phone and look through these screenshots for ideas. With time, your gun will be locked and loaded with hundreds of poses. Remember, it’s all about placing your subjects in the most flattering positions.

Portrait photography for better photography

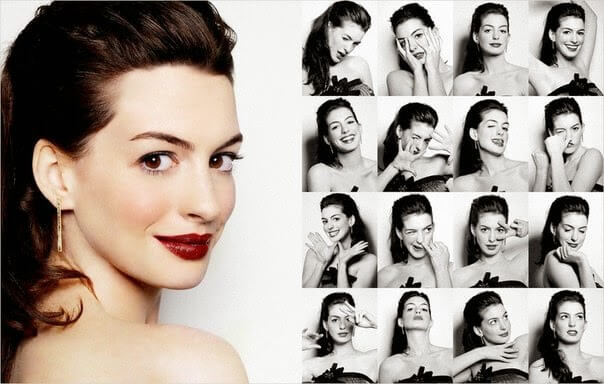
Portrait photography or portraiture is photography of a person or group of people that displays the expression, personality, and mood of the subject. Like other types of portraiture, the focus of the photograph is usually the person's face, although the entire body and the background or context may be included.<wikipedia>

1.  Photograph the subject in their native environment.  Some people just don’t belong in a studio.  They feel awkward and it shows in camera.  So instead of forcing Grandpa into the Walmart Photo Studio, let him go to work in his workshop and photograph him doing what he loves.  Instead of tears and tantrums when you try to dress up your child all pretty for studio punishment, let him play with the toys and snap pictures of every moment.
2.  Never shoot kids or babies from your normal standing height.  This is the view we always have of kids–the tops of their heads.  Get down on the ground and take images from their level.
Portrait photography

3.  Consider giving the subject space to look into.  Place the subject on one side of the image and have them look into space (not the camera) towards the other side of the frame.
Window light
4.  Window light.  Don’t have an expensive studio or want to get more natural portraits? Normal lighting in a house or during the heat of the day is not flattering on skin; however, once light passes through a window, it is very soft and diffused.  Consider placing your subject next to a window so the light hits the model at an angle (not looking straight out the window).  Without much effort, you’ve created beautiful light which studios strain to copy.
5.  NEVER use the on-camera flash.   On-camera flash gives a deer-in-the-headlights look to even the most beautiful subject.  Because the light is perfectly in line with the lens, the light hits the subject squarely and creates a flat light that is far from flattering.  If you choose to use a flash, it’s truly necessary to get an external flash that can be mounted to the side of the photographer.
Portrait photography


6.  I know you want pictures of the face, but you might also consider going smaller.  What about photographing a child’s sandy feet while he plays on the beach or your grandmother’s hands, or your friend’s eye.  Sometimes the tiniest details speak volumes.
7.  Over expose.  I know I just spent two pages telling you not to do this, but over exposing (making the image too bright) is a common and beautiful technique for giving a portrait a clean and simple look.
8.  Do something totally off-the-wall.  Want cool pictures of your friend in her prom dress?  Throw her in the pool with the prom dress on.  Want cute pics of a baby?  Put them in a huge basket like Anne Geddes or dress them in clothes that are 5 sizes too big.
9.  Stop the waving and smiling.  When shooting family pictures, nothing can ruin the moment more than saying, “Hey Dan, look at the camera!”  Your picture will be destroyed.  I’m not saying you have to shoot candid photography all the time, but when you are going to have the subject know you’re taking the picture, at least pose the subject properly rather than having them just stand off squarely at the camera.
Portrait photography

10.  Shoot up to give power; Shoot down to take power away.  In tip #2, I mentioned that it generally isn’t good to shoot down on babies and kids.  The reason is that kids are already small, so shooting down on them is so common that the photo does not look as it should.  Similarly, you can make a subject seem more powerful by shooting from a lower angle up to the subject.  For example, it would be ridiculous to shoot Michael Jordan from above.  Since you want to make a sports star look powerful, it would make much more sense to shoot that subject from a lower angle.
11.  If one person is a bit stale, two people are perfect.  Whenever I’m shooting a subject that gets a bit camera-shy and won’t give me much of an expression, I always try to let the person interact with someone different.  For example, trying to get kids to have fun and smile will be tough without a parent being in the studio too.  This technique works the same with adults.  If your subject looks a bit stale, wait until they talk with someone else to capture the best expressions.
Especially where brides are wearing white dresses, the bride’s teeth need to be perfect.
12.  Whiten teeth properly in Photoshop.  For quite a long time, I brushed exposure onto the teeth to make them look whiter.  I never got the results I wanted until another photography told me that it was better to brush brightness onto the teeth rather than exposure.  Overnight, my digital teeth whitening improved drastically.  Try it!
13.  Contrast clothing and location.  I recently shot engagement photos for a couple who chose to wear bright colors.  The bride wore bright pink and the groom wore a light blue shirt.  Those colors undoubtedly catch the viewer’s attention, so I chose to place them in front of muted backgrounds.  For this shot, I chose old grey brick walls, blurred out dark backgrounds, etc.  The results were perfect!  You can also apply this tip when shooting a model who is wearing muted colors.  In this situation, shoot the model against a brightly colored background to make the model stand out.
Portrait photography

14.  You’re missing out on half of your model.  No, I don’t mean that you could be shooting twice as many people.  I mean that there is a whole other side of your clients that you aren’t shooting at all.  What’s that side?  The back side.  Shots of the subject walking away from the camera, or of the subject’s body turned away from the camera and head facing the camera can be quite compelling.
15.  Think application before taking the portrait.  What is your photo going to be used for?  While many of our photos are just used generally for looking at, some photos would be better either vertical or horizontal if it is going to be used for a specific purpose.  For example, if you’re taking a portrait for someone’s Facebook profile, you can get a much larger picture by shooting it in vertical orientation (up-and-down).  If you’re shooting for a wedding announcement, it’s probably better to shoot horizontal so there is enough room for text on the side of the couple.
Backlighting is great for hard mid-day light.
16. When shooting in poor mid-day lighting, have the subject face away from the sun.  I see this done wrong more often than not.  Most of the time, photographers have the subject face the sun so their face doesn’t look dim and shadowy in mid-day lighting.  This is unfortunate, because the hard light will create unflattering shadows on the face.  The best way to shoot mid-day portraits is to have the subject face away from the sun so their face is in the shade, and then have the photographer over-expose the picture so the face looks properly exposed.
Portrait photography

17.  Spot metering is your friend.  If you don’t feel comfortable setting the exposure manually to do the technique taught in tip #16, then learn to use spot metering.  With spot metering, you can simply have the camera meter on the subject’s face to expose it properly, and then let the background be slightly overexposed.  For some people, spot metering may be a better option than manually setting the exposure for the face.
18.  Whip out the CTO.  When shooting in lower light (or if you have a really powerful strobe), you can put an orange gel on your flash so that the light that hits the subject is, well… orange.  Then, you adjust your white balance (I always just do it later in Lightroom) so the subject looks neutral, which makes the background turn blue.  Here is a great collection of examples of using this color shifting technique.  (Side note: I couldn’t remember the term color shifting this morning, and several helpful readers reminded me on the ImprovePhotography Facebook fan page).  If you’ve never heard of gelling a flash, you will be surprised to know that a gel is not “jelly-like” in consistency.  It’s just a plastic colored transparency.  You can buy a set of gels for around $10 on Amazon that fit most flashes.
here is the other tips
19.  Compose and then focus rather than focusing and re-composing.  Could I have made this tip any more confusing?  Probably not.  What I mean is that it is generally preferable to compose the shot and then move your focus point on to the eye of the subject rather than focusing on the eye and then recomposing.  For more on this, check out this previous post on focus.
20.  Models relax immediately when a prop is introduced.  Being a model is scary stuff.  It’s just you vs. the guy with the giant lens.  When I see a subject feeling uncomfortable, I immediately search for a prop.  Pick a flower and give it to the bride to play with, give the couple bubblegum and take a photo of them blowing bubbles together, give a kid a toy, etc.  You don’t necessarily have to include the prop in the frame (although it usually looks cool), but it is a guaranteed way to get the subject to relax a bit.
21.  Book a “real” photo shoot.  Contrary to popular belief, models are a dime a dozen no matter where you live.  Head on over to ModelMayhem.com and find a local model.  Many of them will not even charge you if you give them copies of the pictures you take.  It’s called TFP–time for prints.  Oh, a warning on ModelMayhem… 90% of the models think their best pictures are when they are “disrobed.”  I always have my wife go on the site and choose a model for me so I don’t have to see the nastiness.  Not cool.
22.  Buy a few scarves.  My wife, Emily, made me include this tip for the ladies.  She said it’s a great tip for dressing women for a portrait photography shoot, but I think it’s because she has an obsession with Confessions of a Shopaholic (the girl the green scarf).  Anyway, it has worked wonders for me in the past.  For $15 you can buy probably 10 scarves at any many stores.  Then, you can have your female subjects wear plain colors (such as a white T-shirt and jeans) and then wear different colors of scarves.  I found that this works GREAT for senior portraits, because teenage girls like “accessorizing” and changing clothes every five minutes.  Big time saver and you’ll get many more looks out of one subject.
Portrait photography

Tuesday, April 12, 2016

Nikon D4S camera review


Professional DSLRs need to be peak performers. They have to be tough, fast and accurate to meet the demands of some unforgiving disciplines – press, sports and wildlife photography, the particular requirements of which insist upon very high specification.
Such cameras have short careers being soon superseded and so it was with the Nikon D4. An immediate winner when launched in 2012, it has been caught by its competitors.
So, the company took its best features and made small but telling changes to the image processing, shooting rate and autofocus then some deft touches, nips and tucks to the body for better ease of use and handling.

Nikon D4S: Features


Speed is the name of the game when it comes to pro DSLRs, and Nikon’s improvements allow the D4S to shoot at up to 11fps – 1fps faster than the D4 – with both metering and autofocus acquisition – but still 1fps slower than the Canon EOS 1D X.
Even so, the improved processing speed allows the D4S to continuously shoot up to 200 fine, large JPEGs or 104 uncompressed 14-bit raw files with a XQD memory card.
The fast and accurate AutoFocus (AF) system is the same as in the D4 – the Advanced Multi-CAM 3500FX, which has 51 AF points and ‘3D tracking’. There is also AF Group selection.
The D4S doesn’t have built-in Wi-Fi connectivity. Instead - access is provided via Nikon’s WT-5 wireless transmitter (costing around £500), which can also be used to trigger multiple remote cameras with the press of the shutter.
This facility has been taken a step further to allow one of the function buttons to fire the remote cameras separately, without actually firing the commanding D4S camera. Press photographers who want to quickly send images back to the press office can do so using the D4S’s new 1000 Base-T (Gigabit) Ethernet socket.
In terms of video capture, the D4S has been given a much-needed 1920x1080 resolution with a 60/50p frame rate, bettering the 24/25/30p rates of the D4.
As before, there’s a stereo microphone socket with the option to adjust the recording sensitivity level. However, unlike the D4, the recording volume can now be altered while recording, when previously it was fixed while shooting.
Uncompressed video footage can be output from the HDMI socket to an external recording device, and the new camera can record the compressed footage simultaneously to the memory card.

Other features are a new interval timer and time-lapse image capture. Those who want to shoot such footage will be pleased that the new EN-EL18a battery can take 3,020 shots, compared to 2,600 with the D4 and EN-EL14 battery.
Finally, the sensor is the same 16.2-million-pixel full-frame (36 x 23.9mm) CMOS version as the D4. However, the processor it is coupled with is the new Expeed 4, which is 30% faster than its predecessor.
This, of course, is the main driving force behind the faster speed of capture but it also brings improvements to image-processing speed and quality.
Consequently, ISO sensitivity now runs from ISO 100-25,600 instead of ISO 100-12,800. The extended sensitivity settings have also been improved with a new Hi4 extended mode that represents a sensitivity of an incredible ISO 409,600.

Nikon D4S: Design

At first glance the D4S and the D4 appear to be dead ringers, the only difference being their respective designations. Look closer, though, and modifications are evident. Though they are small, they should make operating the camera easier.
To begin with, the contours to the grip have been altered slightly, making the hefty 1,350g camera more comfortable to hold generally, but especially when wearing gloves.

The buttons have been modified a touch too, with the rear joystick controls having a textured finish, rather than the raised crowns on the D4.
Of course, being Nikon’s flagship DSLR, the body is magnesium alloy and fully weather-sealed to withstand the tough conditions and rough handling that’s the lot of every such camera.
Although the myriad buttons adorning the camera may look perplexing, the D4S is actually straightforward to use. All main functions have a dedicated button or control, and the small rear and top-plate LCD panels mean all the current settings are displayed – so changing them can be easily done.

Straightforward doesn’t necessarily mean simple. The D4S’s menu system hosts a huge amount of customisable features, and most professionals will no doubt head straight to the autofocus settings to tailor them to their requirements.
The D4S’s viewfinder is the same as the D4, with 0.70x magnification and 100% coverage. It is large enough to allow a really good look around the scene, and bright enough to manually focus, especially with the focus indicator in the bottom of the window.
There’s also a shutter to prevent light entering the camera from the viewfinder during extremely long exposures.
Once again, the rear 3.2in, 921k-dot LCD screen has been brought over from the D4 but, as well as automatic brightness adjustment, there’s the ability to fine-tune its colour.

Nikon D4S: Performance

It’s fair to have high expectations of the D4S’s AF system, and on the whole these were met.
Photographing moving subjects in continuous AF, and with 3D tracking on, the camera tracked more than capably. I shot 11fps and all the frames were in focus. What’s also impressive is that when shooting at 11fps while in 51-point AF with 3D tracking mode activated you can actually see the AF point changing in the viewfinder.

There are a host of alternative focus settings, including the Group Optimised AF mentioned earlier. This uses a group of 5 points and switches between these when focusing – ideal for subjects that remain in roughly the same point in the frame.
The 91k-pixel RGB metering system coped admirably with a variety of scenes including a dawn in central London, a bright afternoon in a country park, and an overcast but bright day at the races. The camera’s scene recognition almost always second-guessed the exposure I wanted.
Images shot in flat lighting with moving subjects are pleasingly bright, with highlights in the sky taken to the point of clipping, leaving plenty of detail in the foreground.

Likewise, highlights in the cityscape were at the point of clipping, leaving lovely detail in the sky, with a brooding, slightly underexposed foreground.
The near-perfect balance between highlight and shadow was helped by a nice JPEG tone curve when in standard image mode. Switching the Active D-Lighting helped lift shadows, with little